
Kilt shoes look simple until the long laces start moving in every direction. That is where many first time wearers get stuck. Tying them is easier than it first appears. Once the pattern is understood, the laces stop feeling awkward. Kilt and Kilts carries Highland wear for different levels of dress, but this small detail still comes down to a neat hand and a little practice.
What Are Kilt Shoes?
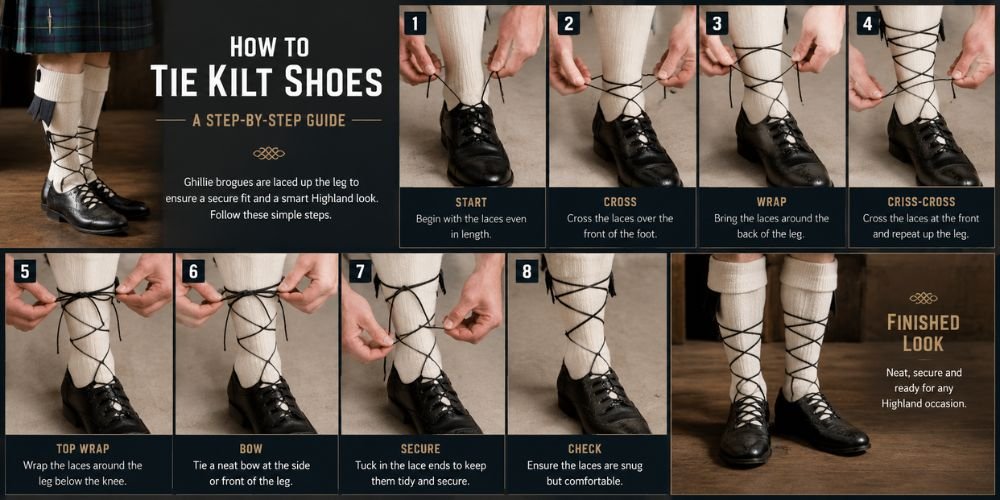
Traditional kilt shoes are usually called ghillie brogues. They are different from standard dress shoes because they have long laces, brogue detailing and usually no tongue.
The design came from practical Highland use. The holes helped water drain, the open top helped the shoe dry faster and the long laces stayed above mud. Today, the look belongs with formal Highland dress.
Ghillie brogues are common at weddings, pipe band events, dinners and cultural gatherings. For relaxed kilts, footwear can change. This guide on utility kilt shoes explains where casual footwear fits better.
Start With the Fit
The shoe should sit firmly before the laces go around the ankle. A loose shoe will still shift while walking.
The wearer should put on the kilt hose first, then the shoes. Both lace ends should be close in length before tying starts. If one side is much longer, the bow will look uneven.
Snug is right. Painfully tight is not. The foot needs support without pressure, especially during long events.
How to Tie Kilt Shoes
The aim is a low, tidy tie that holds without cutting into the ankle.
Tighten the shoe
The wearer should pull the laces as with a normal shoe. The top of the foot should feel secure. Slack at this stage usually leads to messy wrapping later.
Twist at the front
Hold one lace in each hand. Cross the laces at the front of the ankle, then twist them around each other three to five times.
This creates the rope like column seen on well tied ghillie brogues. The twists should be firm, not strained. Loose twists look floppy. Too tight twists bunch up.
Wrap the ankle
Take the laces around the back of the ankle. Keep them low. They should sit just above the shoe, not halfway up the calf.
Some wearers add one or two small twists at the back. That is fine, but the back should not look busier than the front.
Tie the bow
Bring the laces forward again. The tension should feel even on both sides.
Tie a normal bow at the front of the ankle. A double knot is useful for dancing or long wear. The tassels should hang cleanly.
Where Should the Bow Sit?
Most wearers tie the bow at the front because it is simple to see and fix. Some place it slightly to the side. Either can work when the rest of the outfit is tidy.
The mistake is tying the laces too high. Long laces can tempt a wearer to wrap them far up the leg. That usually looks wrong, then slides down later.
Low and clean is safer. The bow should frame the shoe. It should not compete with the kilt hose.
Mistakes That Spoil the Look
A few small mistakes show quickly.
The first is leaving the shoe loose before wrapping the ankle. The second is making uneven twists at the front. The third is wrapping over folded hose. The sock should sit smooth before the laces touch it.
Kilt length matters too. If the hem sits too high or too low, even clean shoes cannot save the balance of the outfit. This guide on proper kilt length is worth checking before a formal event.
Keep Comfort in Mind
Kilt shoes should not hurt. If the laces need to be pulled hard to stay up, the wearer may be tying them too high, starting with too much slack or wearing very smooth hose.
For long events, retie once if needed. New leather can feel stiff, so a short wear at home helps before the event.
Conclusion
Learning how to tie kilt shoes takes a few tries, not special skill. The goal is simple. Keep the shoe secure, the laces even and the lower half of the outfit sharp.
A well tied pair of ghillie brogues gives Highland dress a finished look without drawing too much attention. The Kilt Shoes range is a natural place to compare styles before the laces ever need tying.